My all-natural-bookshelf for $0
Want to make a unique shelf for your books and decoration? Want to spend $0? Here´s an option …
Materials
- Between 7 and 10 stems of bamboo, reed grass or (drift)wood
- (or more, depending on the size you want and the diameter of the stems you choose; you can measure the books you want to set on the shelf to determine the width of the shelf, but don´t forget to add a few extra inches)
-
Rope or the like
- Duct tape
Tools
- Inch rule
- Saw, preferably Japanese saw (see picture)
- Gloves! (the stems can be sharp-edged)
- (natural glue if you need it) https://www.sewhistorically.com/20-ways-to-make-homemade-natural-glue/
Step 1 – choosing your material
Bamboo, reed grass and branches are your best options. Make sure, it´s sturdy enough to carry some weight. The straighter the stems, the better. You don´t need to cut down fresh ones but use ones that have broken off if you find them. They have the advantage that they might be drier.
Check if the stems are intact and not cracked and if there´s anything living in them (I had one with a colony of earwigs)
Make sure they have the desired length. Take a few stems extra with you, just in case.
Step 2 – cut and wash
Select the stems you like best and cut them into the length you want them. Tipp: Use a Japanese saw (if you´re doing woodwork frequently, it pays off to have one). Be sure to remove any buds or the like sticking out at the sides, otherwise you won´t be able to tie the stems close together.
Wash them (I used a sponge and water) and let them dry (this usually doesn´t take long). Tipp: rub off the brittle bark (see 3nd picture below).
Step 3 – tie together
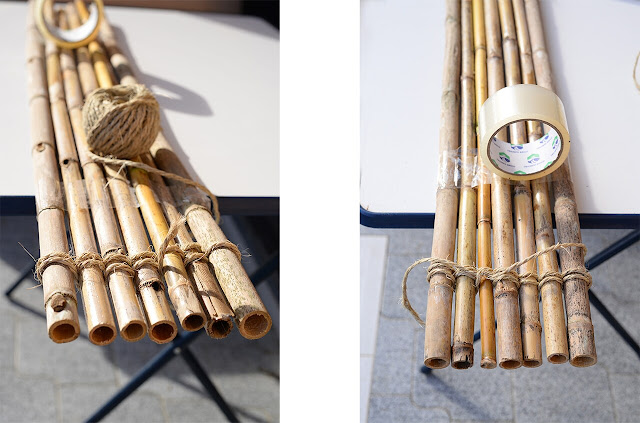
Lay out the stems next to each other according to your taste. You can choose whether you do so randomly or try to stick to a similar tone (or have an alternation of tones) or if you want an alternation of thick and slim ones (it´s easier if they are similar in diameter). Keep in mind which side you want to have as the upper- and underside.
Use duct tape to secure them, while you wrap the rope around each single stem going up and down. Try to tie the rope as tight as you can without having the stems bulge up or down. Tipp: place the shelf on a table and have it jut out over its side. It makes it easier to wrap the tape and the rope around the stems. Use the rope at least at both ends. The longer your shelf, the more rows of rope you should have.
Make a knot at the underside of your shelf. If it doesn´t hold, you can use glue on the rope (you can mix your very own natural and completely organic glue, find the recipes here). https://www.sewhistorically.com/20-ways-to-make-homemade-natural-glue/
Step 4 – check length and stability
If, after tying everything together, the stems aren´t aligned lengthwise, with some jutting out, you can still correct this by cutting them again. In this case, make sure to secure them properly (wrapping them and the table tightly with duct tape together works). However, I did not mind that the stems didn´t align perfectly and left them that way.
Remove the tape and check whether your rope is enough to hold it all together. You can always add another piece of rope in the centre or the like.
Step 5 – hang it up and decorate
I used more of the same rope to hang my shelf, wrapping it around screws with thick heads (they were already in the wall, but I´m sure there might be more elegant solutions for this). Test the stability by adding a book and then some more. I tried different variations to decorate it. I loved the combination with a small plant and my favourite books on the shelf, so that prevailed 😊
What would I have done differently?
Use thicker and nicer rope (less frizzy)


Comments
Post a Comment